Showing posts with label hairstyles. Show all posts

Wednesday, March 14, 2012

Victory! ...rolls

This week I've had my dear friend Joyous to visit from Toronto, Canada. We tromped around every single antique store in the area, including one that isn't listed... because it's somebody's barn. We found lots of little treasures!
Joyous found a beaded coin purse, a sweet apron, a teacup and saucer, and several sets of cameo stud earrings. I had my eye on bigger quarry (as I do not have to lug it back to the north country) and came home with a lamp-slash-endtable, a teak letter-and-key holder, a small wooden recipe box, an embroidered table runner and a fabulous Pendleton Knockabouts jacket, complete with leather-patch elbows!

This week has been no less than victorious, not only in great vintage finds in our small town, but also in more hair experiments! First we thought we'd do pin curls for a mandolin concert this week, but time flew by and left us with too few hours to put it together. Instead - Victory Rolls!
As you can see, we made the most of it. We both have very straight hair, which I thought would prove more challenging than it actually did. Joy has lots of hair that's very fine, and I have thick hair but not as much of it. Soon I hope to post a video tutorial of how to do this particular hairstyle, but until then, here's what we did:
  1. If you start with wet hair, throw in some mousse and blow dry. If you start with dry hair, hairspray the heck out of it and then brush it.
  2. Take two vertical sections of hair from each side of your head and throw the rest in a ponytail.
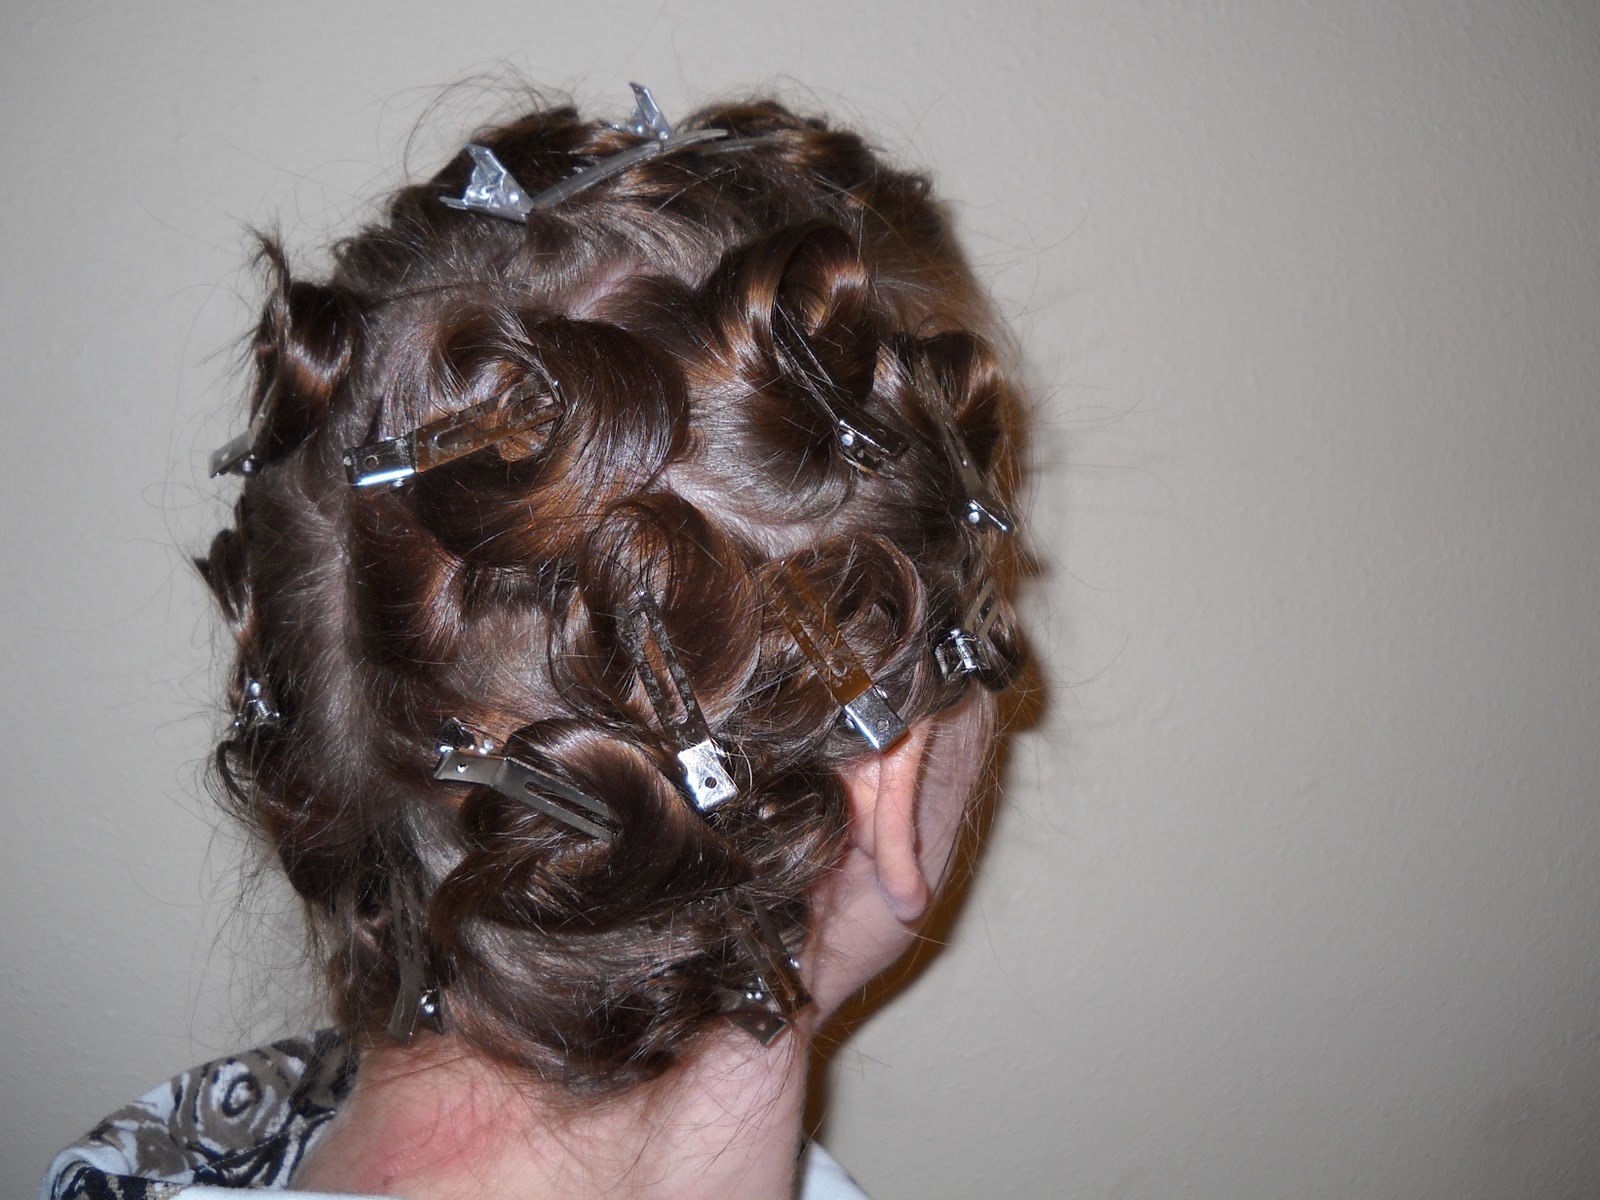
  3. Backcomb each of the four sections on the back side, using hairspray as necessary (we used quite a lot).
  4. Use a 1"-barrel curling iron to curl one section towards the back. When it's sufficiently curled, use your hands to roll the section away from your face into the long rolls you see in our pictures.
  5. Use two bobby pins to secure the roll at the top and the bottom. You can play with the roll to make it looser or tighter, depending on how much volume you want.
  6. Do this for each of the four sections, pulling your bangs aside if you have them.
  7. For those with said fringe, hold them straight up from your head, spray them, and curl them in a large curl towards the front. Leave it to cool, then backcomb the back side and roll them into a standing pin curl off to one side. Secure with a bobby pin.
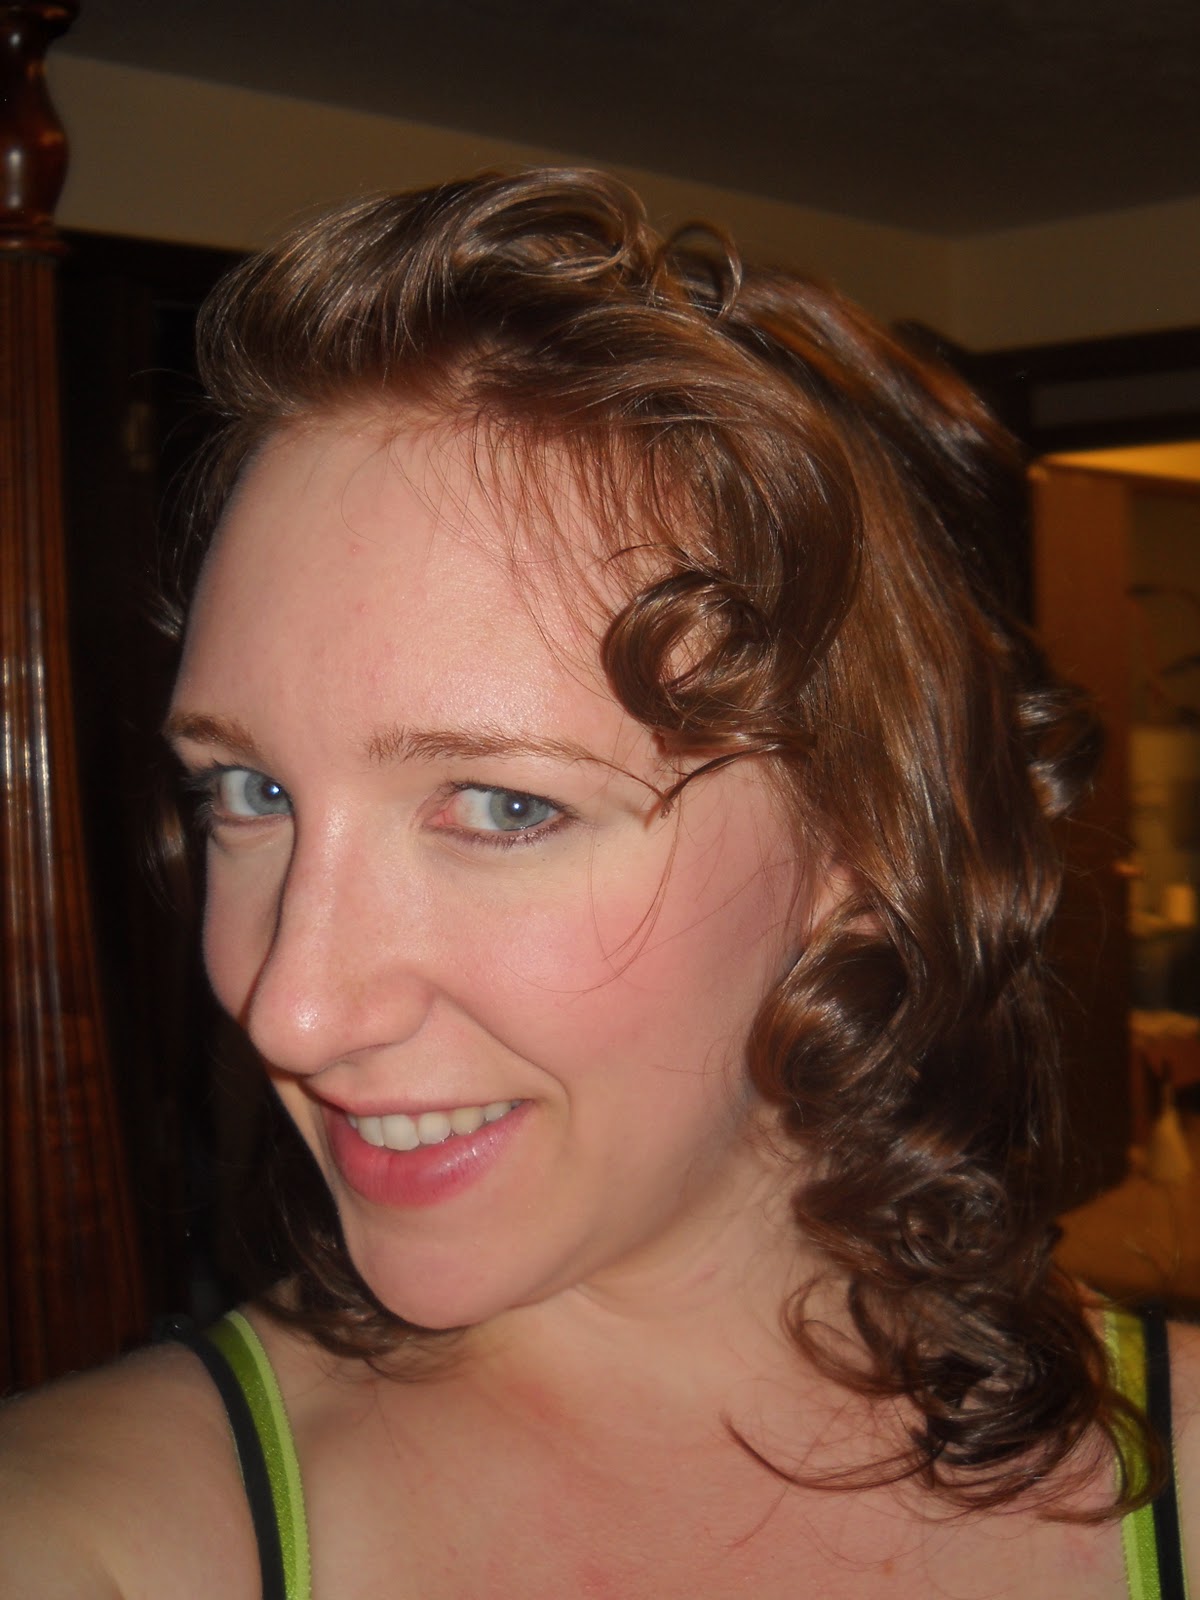
  8. Undo the ponytail you put up earlier. Curl the hair in sections - use hairspray to make sure the ends don't fall out immediately (it's not terribly important that they stay really curly).
  9. Brush the curls and put your hair up in a high ponytail again. Split the hair on the top to make a pocket just above the elastic band, loosening the ponytail, and tuck the hair into it. Leave the last few inches of the ponytail untucked.
  10. Curl the last few inches of the ponytail around the pocket of stuffed hair to hide it, and pin it with a bobby pin.
  11. Spray, spray, spray! We took on wind and rain with this style, and nary a hair was out of place when we returned.
Cheers!
Marjorie

Monday, December 19, 2011

Flashbacks

I've been very good the last two months about getting pictures taken in the most fabulous vintage outfits I've come up with from small acquisitions here and there. Posting them? Not so diligent on that front. So now here they are, from hats to hose, if not in my own collection, then what I envision in the near future.

A couple of months ago, my dear friend Birdie of Oak Tree Apothecary and I spent several days creating and canning homemade chili together. I was quite proud of my concoction - a delicious ensemble of beans, corn, ground beef, tomato puree, hominy, spices, and several secret ingredients. 

Canning is a lovely sport made easier by friends with more knowledge than oneself. It makes large quantities of food last longer, and if said food is especially tasty, it's a way of inviting back the memory of a great day of cooking and canning and watching Poirot in the meantime.

Sidenote: Okay, is anyone else who read Atlas Shrugged annoyed that they set the movie in the modern day? The 1940s is a much better context, not only for its fabulous fashion, but also for its much-more-understandable background of railroads.

Anyway, canning day also happened to be pin-curl day, and I couldn't have my lovely curls falling into the chili, could I? So I wrapped them up into a turban of sorts with a pink scarf. I learned a better way from Solanah at Vixen Vintage, but my scarf has no stretchability, so I satisfied myself with a lounging bow atop my head.

Incidentally, after getting myself used to doing a pin curl set, I've found it requires both diligence and strong arms. It isn't the kind of thing one can just do in five minutes, and for that I both respect the process and fear it. The result is always fabulous - once you've gotten the hang of it - so in my view, always worth doing. Do read what Solanah has to say about pin curls, though, to get a feel for how a regular pin-curler plans the process.

The photos below highlight several ideals of vintage periods (as you may have now noted, I tend to stick with the mid-20th century).
Bottom-left: satin hat with brooch, textured scarf as belt, blouse tucked in
Center: textured blouse tucked in, high-waisted skirt, bright belt, satin wrap Bottom-right: pin curls wrapped forward at each side and bangs back, pill box hat, fitted heavy-wool coat, reminiscent of the Dior A-line


More delightful vintage ensembles to come! 

Thursday, September 22, 2011

Pin curls! - Attempt #2

...and, one would hope, more helpful this time.


Another attempt at a 1940s-era hairstyle--this one more successful (it just takes practice!). I started by parting my hair into three sections - left, right, and back - and made smaller pin curls than last time. I curled my bangs forward and to the left this time. I used 24 pin curl clips and several bobby pins for this set. I included my most recent headgear acquisition at the end, a perfect touch on top of this particular hairstyle.

Here is a good look at the back of my head with all the pin curls in. 
They don’t have to be very organized, just using all your hair. And the pin curl clips them-selves don’t have to cover the whole curl.


Smaller sections make for tighter curls, and larger sections often require more clips.
I curled the front-side sections the same direction on purpose: counter-clockwise. This helps when I want them to frame my face after I brush them out.
I pulled my bangs across and then curled them counter-clockwise as well. This allowed me more ability to mold them once they were brushed out.


This is with all the clips removed. Stop here to create the Shirley Temple look.

Unclip, shake out the curls, spray down, and run your fingers through with de-frizz gel or spray. It’s a bouncy look, fun for those with straight hair and hat if you like.


As you can see, the bangs are looser curls but they are fairly uniform to allow me to keep them over my forehead. They are also long enough for me to pin them down as I please.


Here I have liberally brushed out the curls.
The bangs were not compliant when I brushed them straight out, so make sure to curl with the brush if you can (round brush!).
Also, brushing each curl individually gave me a lot of volume in the back.


The final product!

I used the brush to curl the bangs and sprayed them into place. The longer bangs were curled and pinned under, and are neatly hidden by the hat. 
I had enough volume to wear a hat that would emphasize the shape, and the veil is a lovely finishing touch.

Wednesday, August 31, 2011

Pin curls - Attempt #1

This is one of my first experimental pin-curl escapades. For this particular ‘do, I used regular mousse, a blow dryer, liquid (spray) styling mousse, about 14 pin curl clips, a boar bristle brush, some hair pins for my bangs, and a bunch of hairspray to keep it all together.

Styling: This set took about 30 minutes to put up. I took fairly large sections of hair, and each section required a pin curl clip as well as a bobby pin. 

I curled large sections because I only had 12 pin curl clips. I would recommend using more clips (so you don’t have to use bobby pins) if you want the curls to come out tighter. 

I struggled with my bangs; there are a lot of options! In the end I used plenty of liquid styling mousse to force them to bend backward like that, creating a bit of a bouffant. I curled most sections the same direction, which helps when brushing them out.


This shows the lovely array of curls when all the clips have been removed. 
Styling: If you use lots of liquid styling mousse (as I did), the curls will be stiff and hard to disentangle. I lost a lot of hair trying to brush them out for this set, and that isn’t necessary. The key is gentleness.
Brushing: The easiest way to brush them out is to use a boar bristle brush (round or flat) and brush out one curl at a time. Unless you’re in a very humid area, your hair should hold plenty of curl even when you brush it out.
Not of encouragement: Be patient. Pin curls are not about speed, they are about finish. Take your time and enjoy the process.


Here is the finished look. I have improved on the vintage-ness of the look since this pin curl set, but this is a good start. 
Brushing: I brushed out my bangs and curled them back into position with my fingers, the brush, and used bobby pins (my hair color) to keep them in place. For the rest, once I brushed out the curls, I kept brushing to encourage them all into the same position. They all folded nicely in to frame my face. I brushed the back curls under, and used hairspray to glue it all down.

The finishing touch would be heavy eye makeup (if you have a forehead like mine) and dark lipstick. Et voila!


More such escapades to ensue! I look forward to getting better at this.